Editor basics
Understand the Visiolix editor
Learn how the workspace is organized, then use the object tree, Object properties, and viewport to turn a 3D model into a clear guide.
Editor tour and viewport navigation
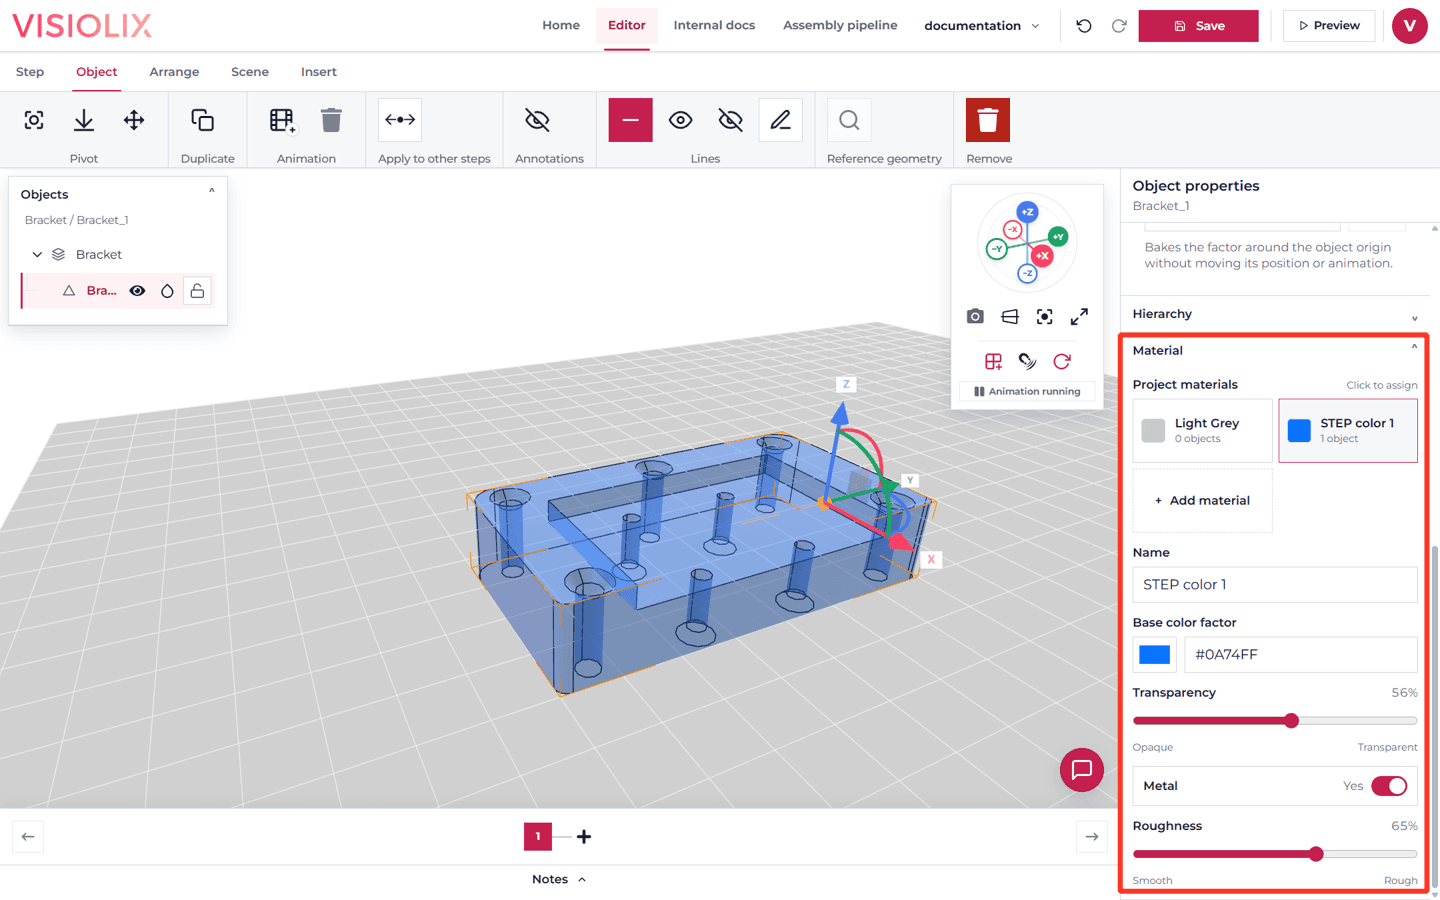
The editor is organized around focused workspaces. Use the tabs above the ribbon to switch between Step, Object, Arrange, Scene, and Insert.
- Ribbon (1): commands for the active workspace, such as adding a step, setting a pivot, or importing a file.
- Object tree and viewport (2): the object tree on the left organizes the scene, while the central 3D view is where you inspect and directly work with the model.
- Object properties (3): the panel on the right for the selected object’s properties and focused setup tasks.
- Timeline and notes (4): the bottom workspace for moving through the guide and adding instructions.
Use the navigation widget in the viewport to choose an axis view, fit the model, switch projection, and control snapping. Saving a camera view in the Step workspace records the view for the current guide step.
Selecting and organizing objects
Select a part either directly in the viewport or by choosing it in the object tree. The selected object is highlighted and its applicable properties open in Object properties.
- Expand or collapse: a parent in the tree to focus on a branch of the model.
- Hierarchy: use the section in Object properties to parent objects and build a meaningful structure.
Control a part in the current step
The object-tree row actions combine presentation controls with an editor control. When an object has descendants, these actions can affect the whole branch through the hierarchy.
- Show or hide: controls whether the object is visible in the current step. This state is saved with the step and is also reflected when readers open the guide in viewer mode.
- Ghost: keeps the object visible but makes it recede. Use it to show where the current part belongs without competing with the active action. Ghosting is saved with the current step and is visible in viewer mode.
- Lock: prevents the object, and any descendants covered by the lock, from being selected or manipulated in the editor. Locking does not hide or ghost the object, is not shown as a viewer feature, and is saved for the current step rather than applied globally.
Keep the two purposes separate. Use show/hide and ghosting to compose what readers see in each step. Use locking only while authoring when a finished part should not be moved accidentally.
Moving and transforming objects
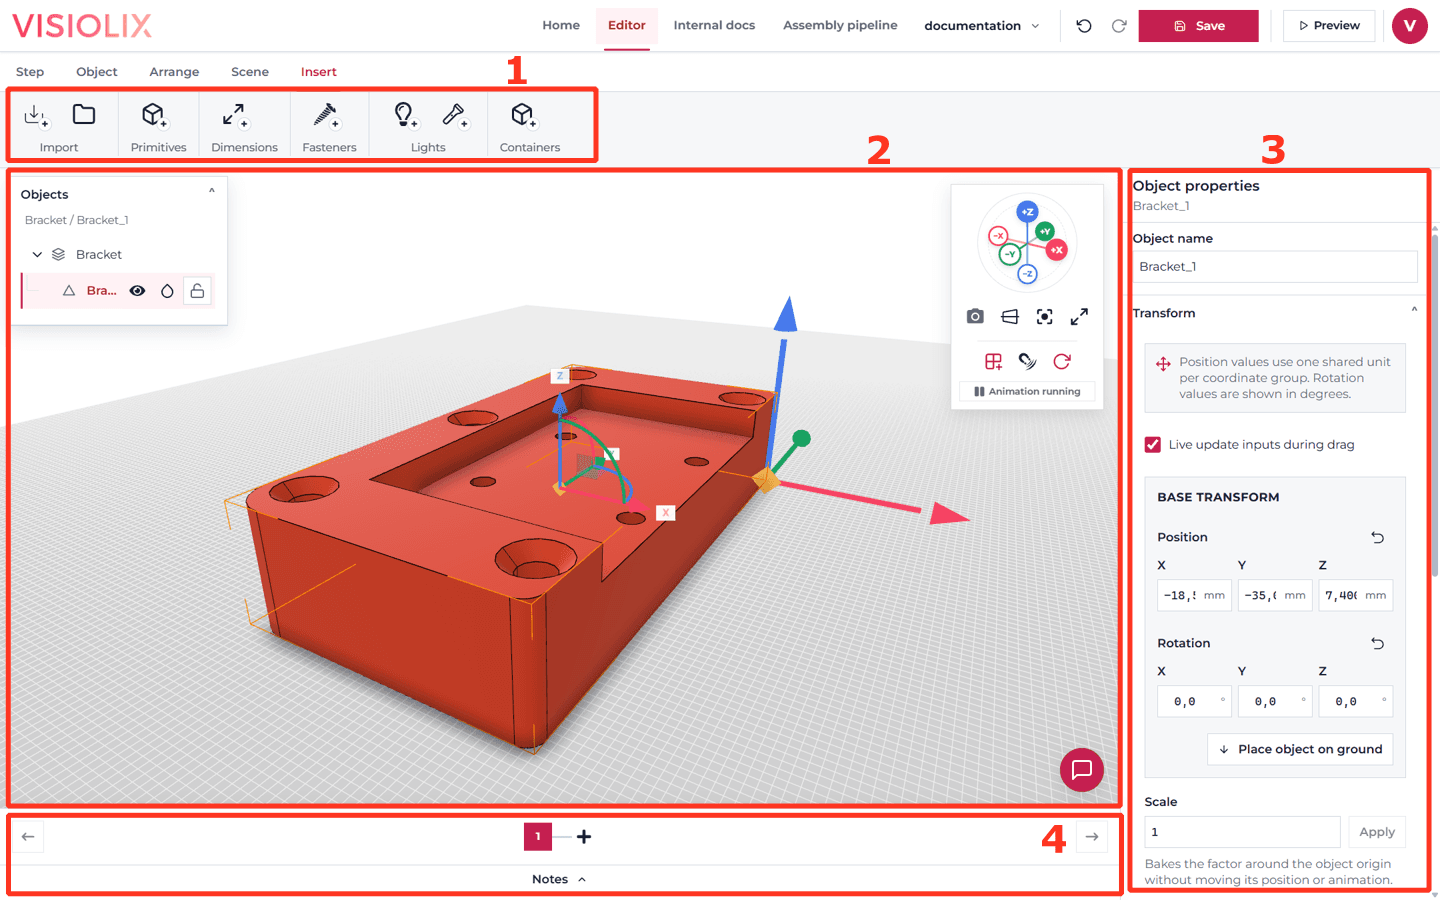
Select an object, then use the Transform section in Object properties (1) to change its position, rotation, and scale. The editor applies those changes to the selected object in the current step.
- Select the part: choose the object you want to adjust.
- Set the transform: enter precise values in the transform fields (1), or use the direct-manipulation gizmo in the viewport (2).
- Use snapping: open the Scene workspace’s snapping settings and adjust the grid snapping precision (3) when the placement needs a consistent movement distance or rotation angle.
The timeline and notes remain available below the viewport (4), so you can keep the current guide step in context while adjusting a part. Check the model from more than one viewport angle before continuing; a position that looks right from the saved camera may still need adjustment in the overall assembly.
Pivots
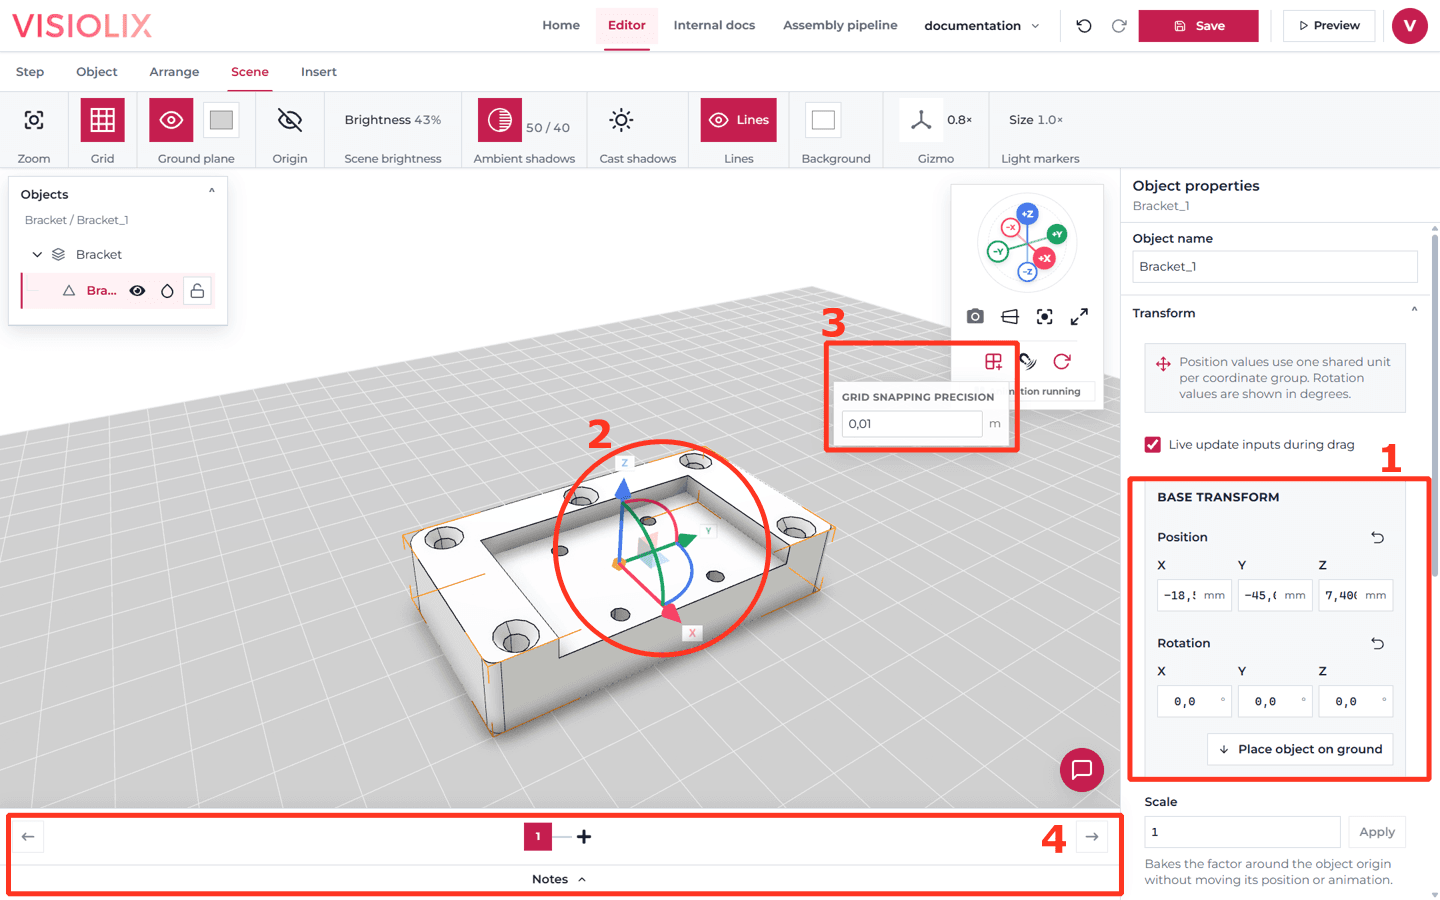
An object’s pivot is the point it rotates around. It is especially important for animation, rotation, and presenting a part’s movement accurately.
- In the Object workspace, use Center pivot to put the pivot at the object’s center.
- Use Bottom-center pivot when an object should rotate or stand from its base.
- Use Place pivot to position it manually in the viewport, then confirm or cancel the placement task.
Choose the scope after setting the pivot. Visiolix asks whether the new pivot applies to This step only or All steps that contain the object.
- This step only: changes the pivot in the current step. Other steps keep their existing pivots, so the same object can rotate or animate around different points in different steps.
- All steps: applies the new pivot to every step containing the object. Visiolix compensates the object, its direct children, and animation targets so their existing visible poses stay in place, while future rotations and animations use the new pivot consistently.
Materials
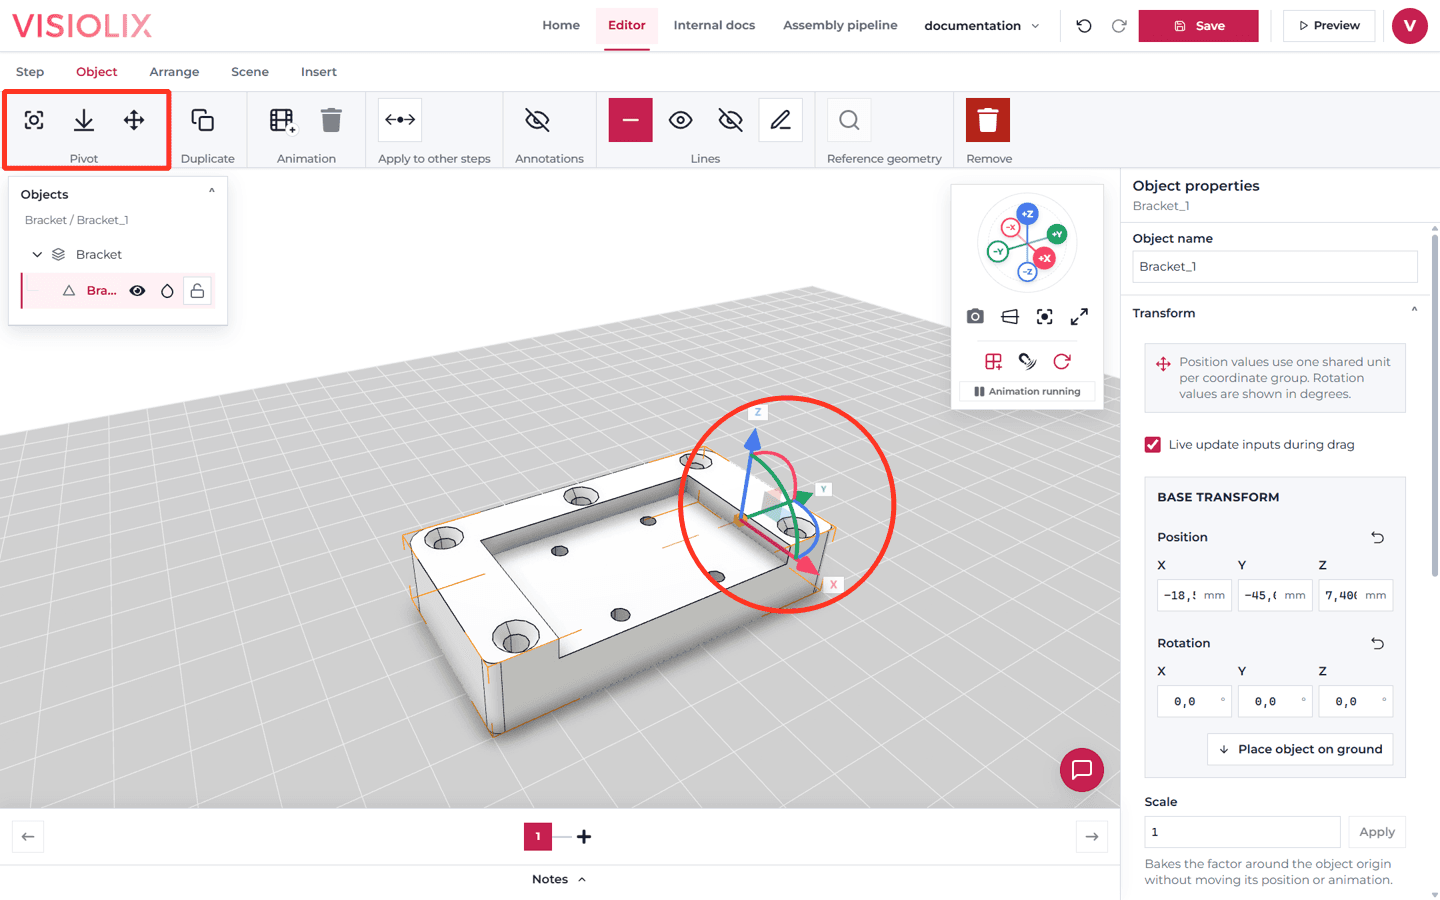
Materials are reusable appearance definitions. Select a mesh object and open its Material section in Object properties to review or adjust the material assigned to the object or to one of its material areas.
- Base color: sets the main color of the surface.
- Roughness: controls how sharply the surface reflects light. Low values look smooth and polished; high values spread reflections and look matte or rough.
- Metal: controls whether the surface behaves like a metal. Use it for materials such as steel or aluminium; leave it off for plastics, painted parts, rubber, wood, and other non-metals.
- Transparency: controls how much of the object can be seen through. At 0% the material is opaque; higher values make it more see-through.
- Imported channels: an imported color, roughness, or metalness texture may be marked Source-controlled. Use Override when you want to replace that imported channel with a local project value.
- Containers and lights do not use the standard material editor because they serve organizational and lighting roles.
Manage project materials
The Project materials library contains reusable materials for the whole project. Select a material card to assign it, then edit its fields to update the shared definition.
- Users: the small count on a material card shows how many assignments currently use that material. A normal one-material object contributes one user; an object with multiple material areas can contribute more than one because each area is a separate assignment.
- Rename: edit the Name field. Renaming changes the shared library entry and its name everywhere that material is used; it does not create a new material.
- Create: select an object or material area, then choose Add material. Visiolix creates a new project material and assigns it to that selected object or area so you can edit it independently.
- Delete: a delete button appears for a non-default material only when its user count is 0. If a material is still used, assign those objects or areas another material first. The default material cannot be deleted.
Materials and areas
An area is a separately materialized region of one mesh, while a material is the reusable appearance definition assigned to that region. One object can therefore contain several areas, and several areas or objects can share the same material.
When you import an OBJ that uses several MTL materials, Visiolix keeps the model as one object but creates a material area for each imported material slot. The Material section lists those areas, usually using the names from the source file. Select an area before assigning a material to change only that region; editing the shared material itself updates every area that uses it.